Edit rules
Edit rules can be used to edit the source text before translating it with MT models (pre-edit rules), or to edit the machine translation (post-edit rules). Pre-edit rules can be used to compensate for errors and deviations from normal text that exist in source texts (misspellings, text processing artifacts etc.), which may otherwise degrade the MT quality. Post-edit rules can be used to modify machine translations to correct incorrect terminology or punctuation mistakes.
Note: Edit rules are available in OPUS-CAT MT Engine version 1.2.0 and later. See the installation page for instructions on how to download the latest version of OPUS-CAT MT Engine.
Edit rules can be defined in the Edit rules tab of OPUS-CAT MT Engine. Regular expressions (.NET regex flavor) can be used in the rules. Rules are organized into rule collections, which can contain any number of rules.
Contents
- Quickstart (pre-edit rules)
- Rule collections
- Post-edit rules
- Rule testers
4.1 Testing the entire translation pipeline - Managing rule collections
5.1 Importing and exporting rule collections - Using regular expressions in rules
6.1 Capturing groups
6.2 Changing the character case of text matched by capturing groups
6.3 Referencing source pattern capturing groups in post-edit rules - Using rule collections sequentially
1. Quickstart: Adding a simple pre-edit rule
-
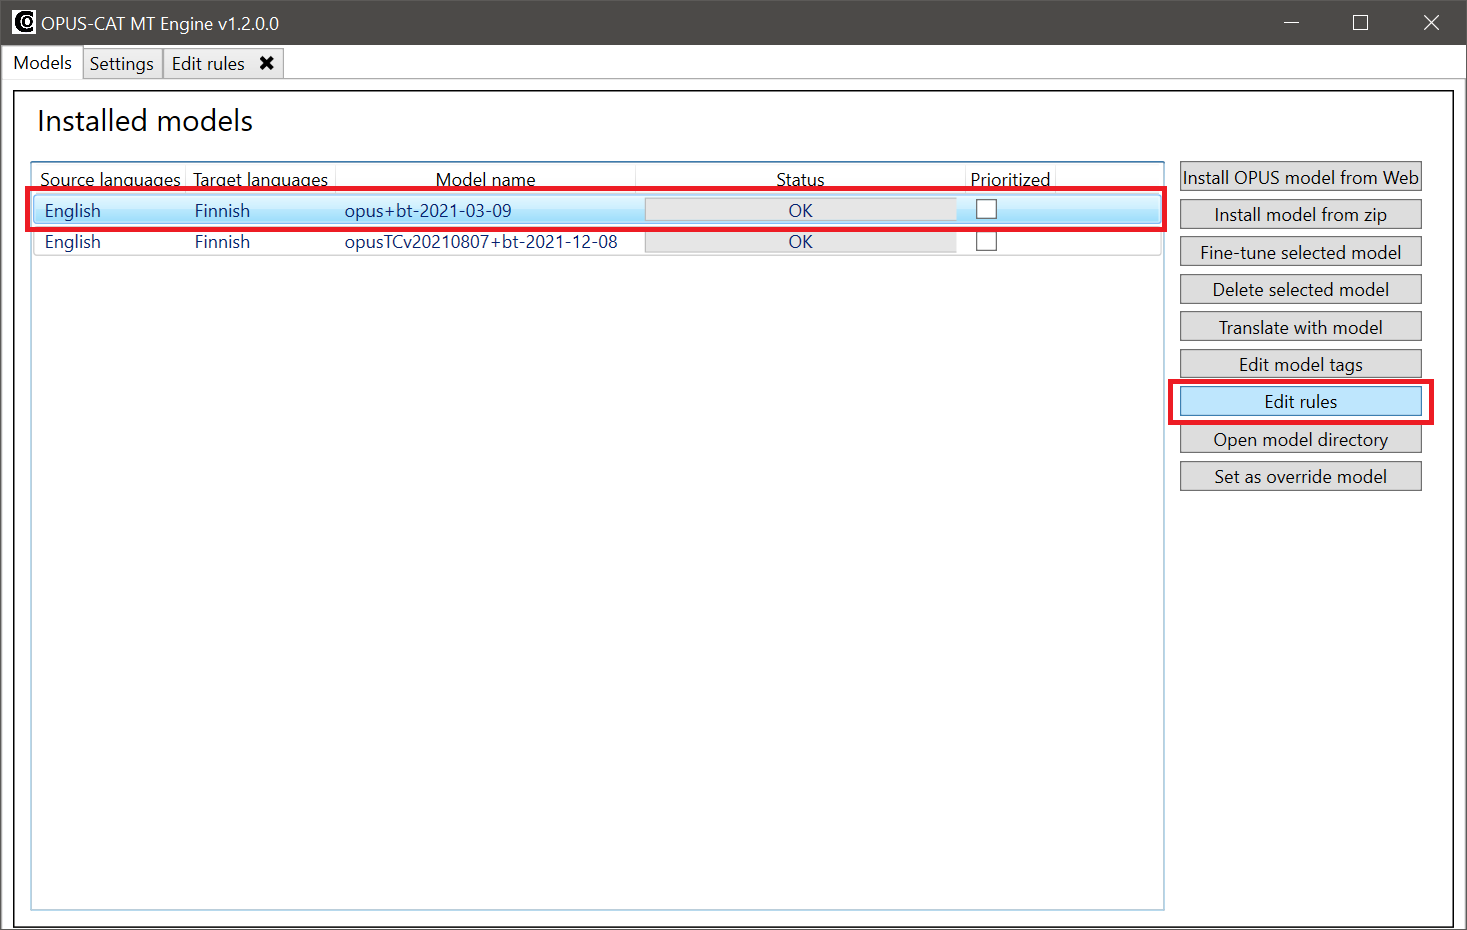
Select a model from the Models tab and click Edit Rules.
-
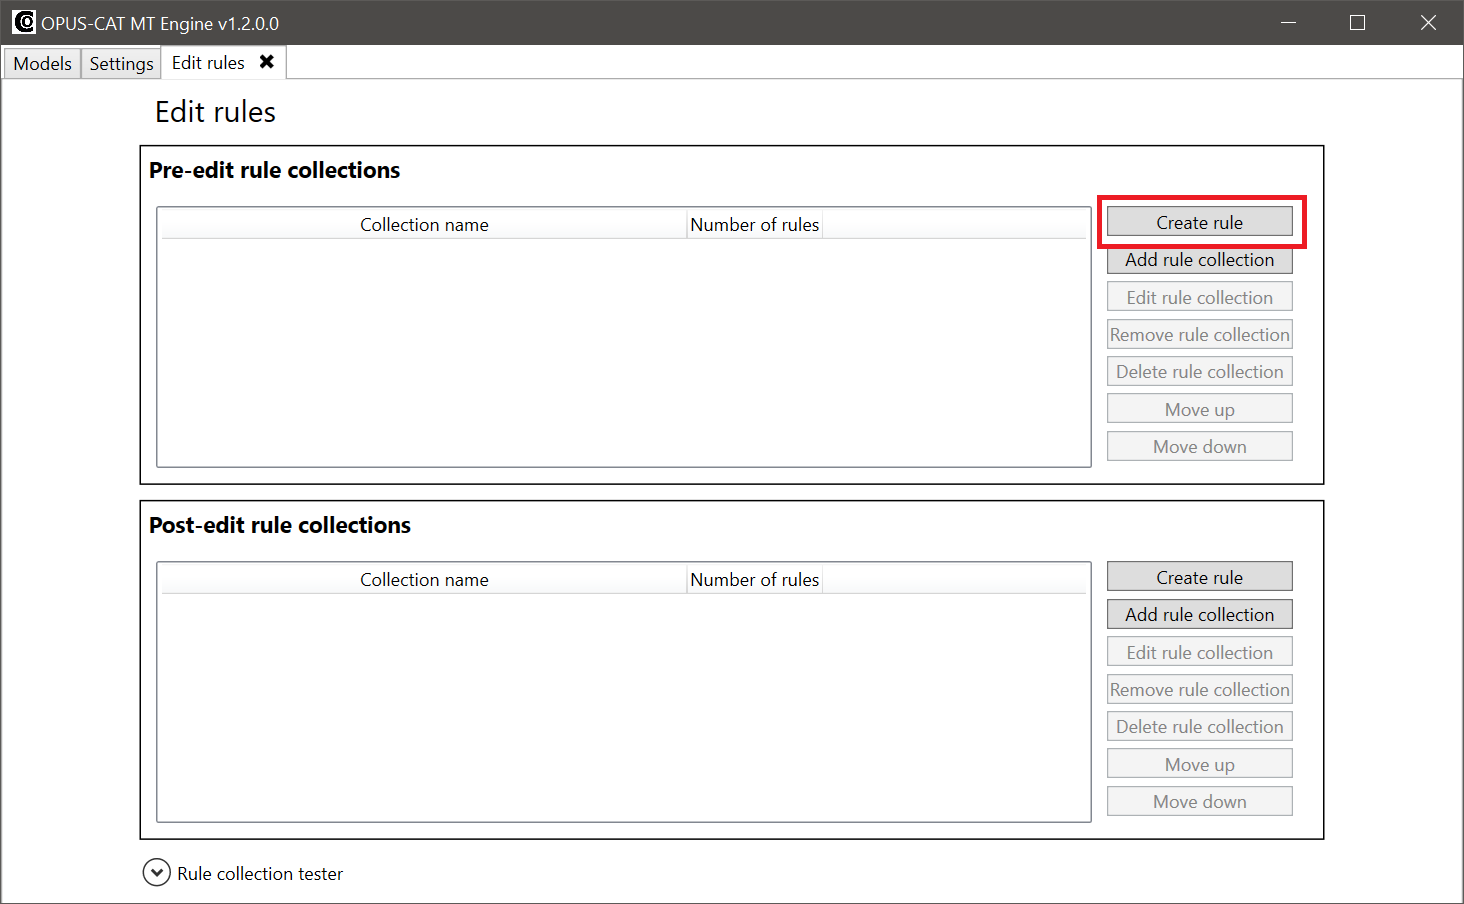
The Edit rules tab opens. Click Create rule in the Pre-edit rule collections section.
-
The Create edit rule window opens.
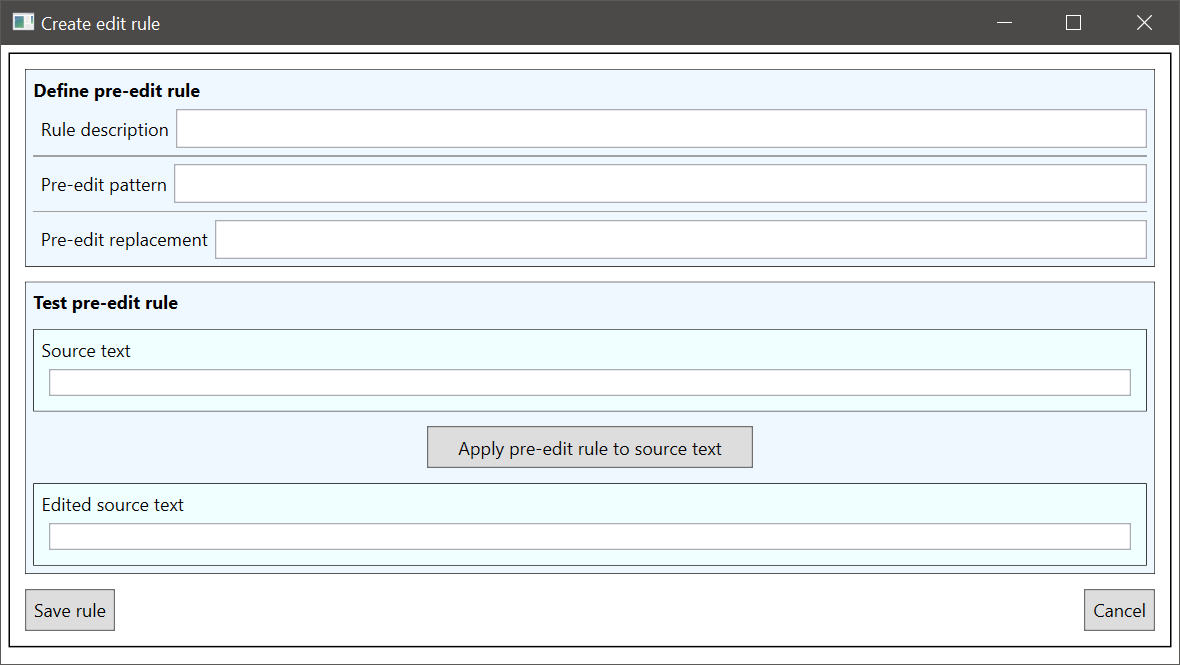
The Create edit rule window has two sections. The rule is defined in the upper section, and the rule can be tested in the lower section. There are three fields in the upper Define pre-edit rule section:
- Rule description: Freeform description of the rule, preferably as informative as possible.
- Pre-edit pattern: This is the pattern that the rule will search for in the source text.
- Pre-edit replacement: This is the text that will replace the part of the source text that has been matched by the Pre-edit pattern.
-
Let’s create a simple rule. One use case for pre-edit rules is correcting common misspellings in the source text. Let’s assume that the word achieve and its derivatives are systematically spelled as acheive in the source text, which results in the MT being incorrect. This problem can be fixed by applying the following rule:

-
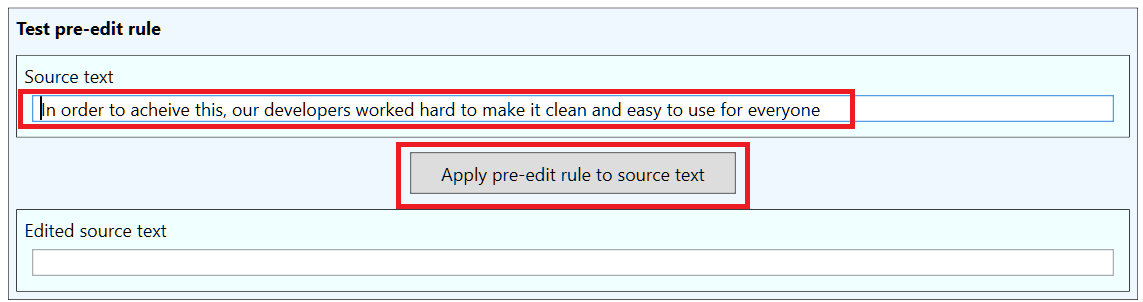
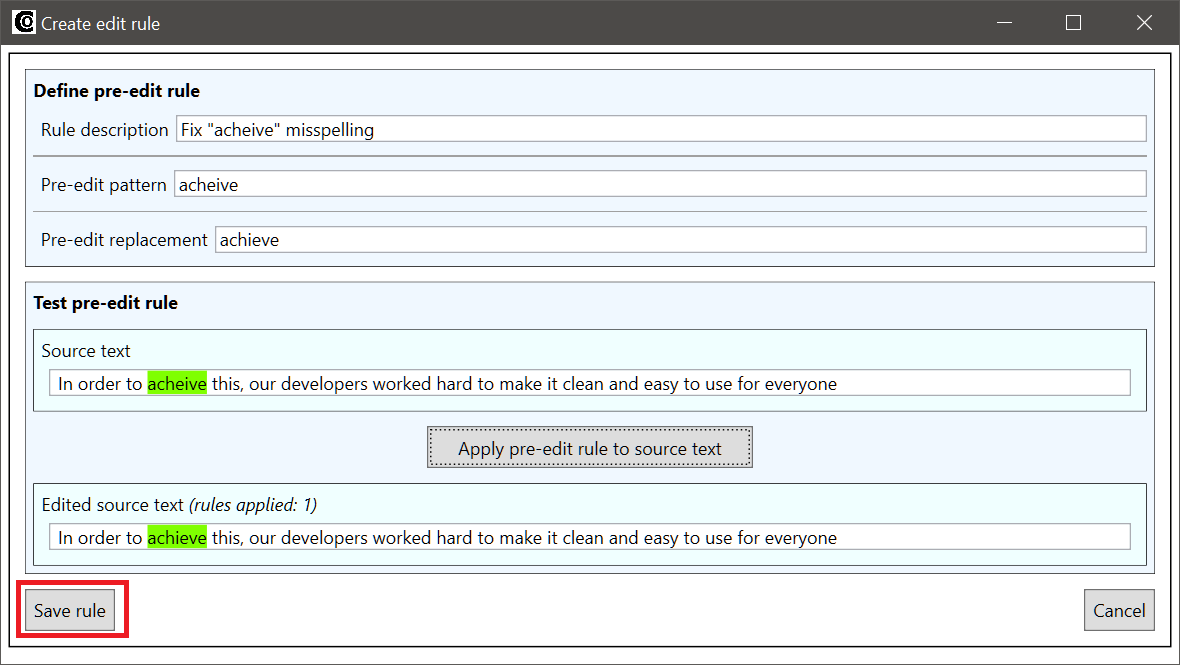
The lower section of the Create edit rule is the tester, which can be used to verify that the edit rule works as intended. To use the tester, enter a test sentence (in this case, any sentence containing “acheive” will do) into the Source sentence box, and then click the Apply pre-edit rule to source text button:
-
The tester displays the result of the rule application. Parts of the source sentence that match the rule are highlighted, as are the replacements performed in the edited source sentence:
-
Now that the rule is tested and verified to work, you can save it by clicking Save (note that testing the rule is not required, but it reduces the chance of mistakes, especially with more complex rules). When you click Save, the Create edit rule window is closed, and the new rule is displayed on the Edit rules tab of the MT Engine, and it will now be applied when machine translations are generated with this model:
2. Rule collections
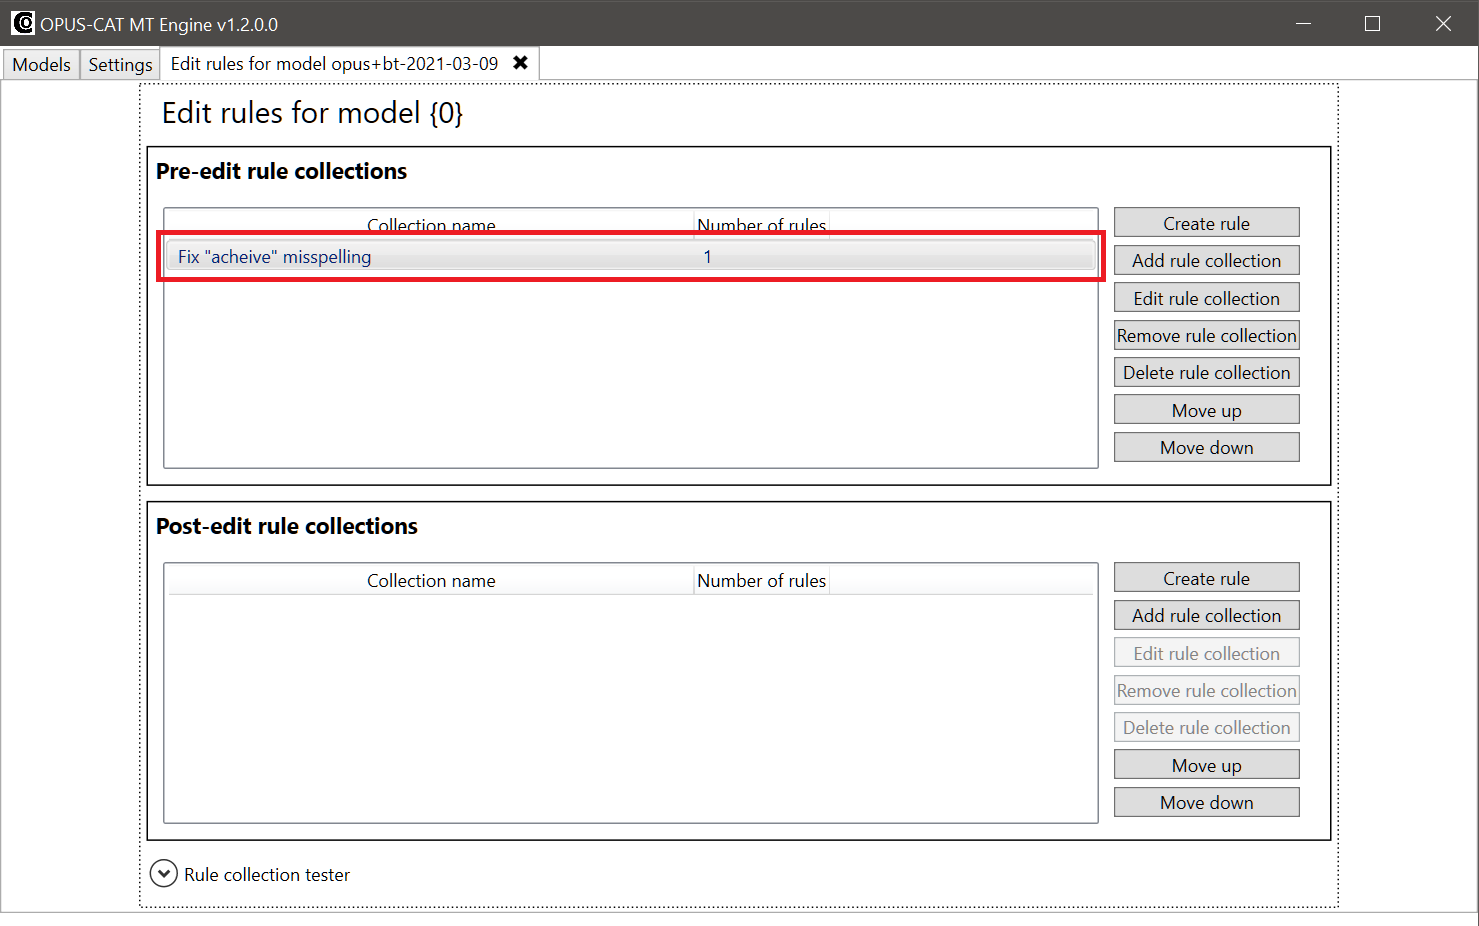
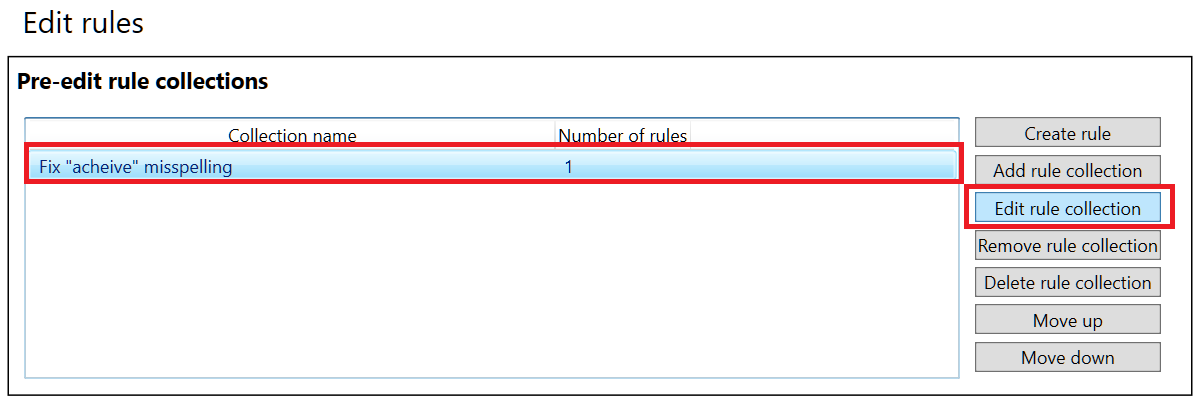
As mentioned, edit rules are organized into rule collections, which may contain any amount of rules. Every rule must be part of a rule collection, so when you create a rule using the Create rule button (as in the quickstart section above), a rule collection is also created to contain the rule. The default name of the created rule collection is the same as the description of the rule that it contains (fix “acheive” misspelling in the example above). You can edit a rule collection by selecting it from the list and clicking Edit rule collection:
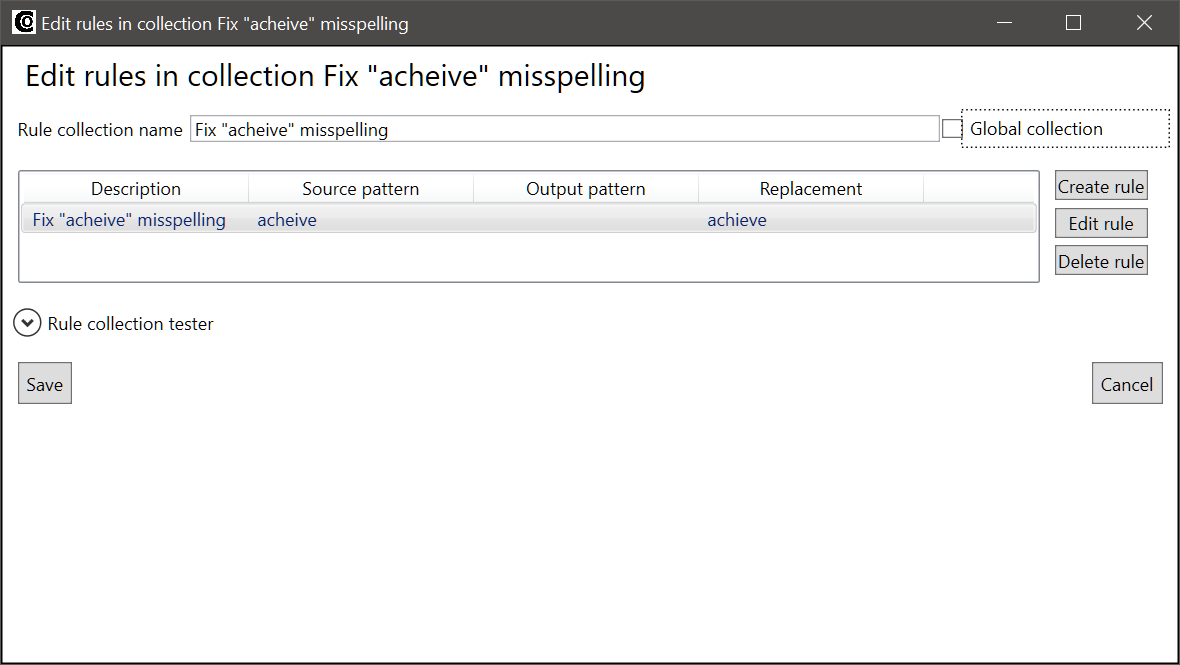
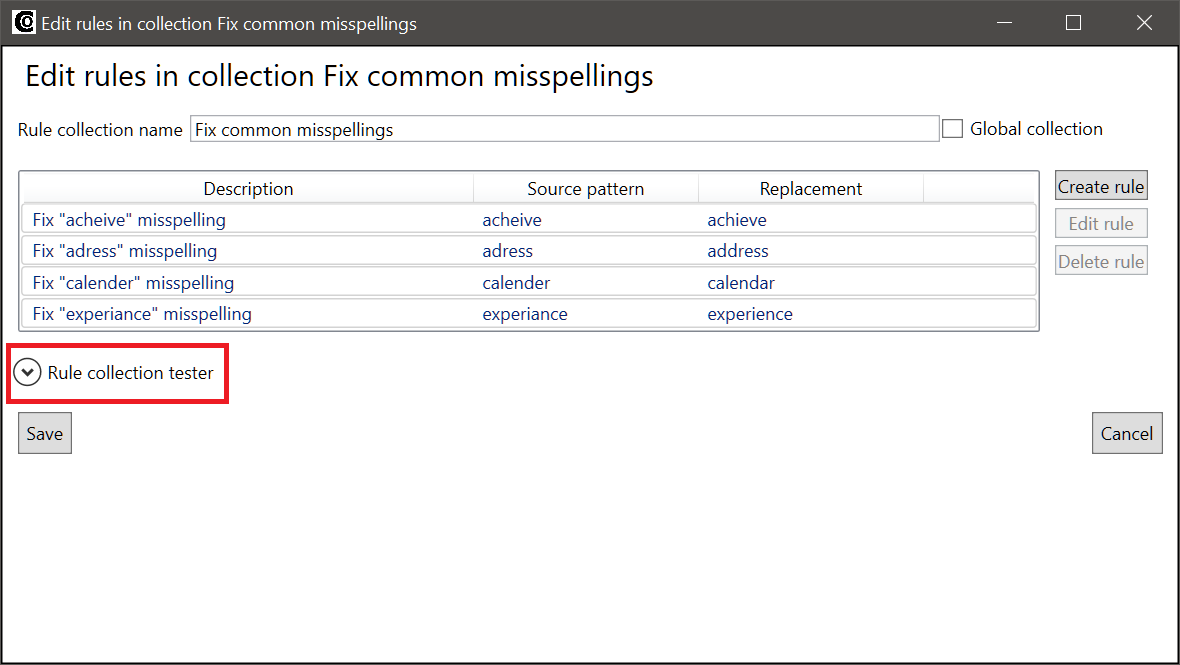
The Edit rules in collection window contains a field for the name of the collection, and a list of rules in the collection. You can use the buttons on the right side of the list to manage the rules in the collection:
- Create rule: Creates a new rule in the collection. This button opens the same Create edit rule window as the Create rule button in the Edit rules tab. The only difference is that a rule created with this button will be added to the existing collection.
- Edit rule: When you select a rule from the list and click this, the rule opens in the Create edit rule window, and the rule can be modified.
- Delete rule: Deletes the rule from the collection. Note: If you have deleted a rule with this button, the rule may still be recovered by clicking Cancel in the lower right corner of the Edit rules in collection window. If you click Save in the lower left corner of the window, the rule will be permanently deleted.
The Edit rules in collection window also contains a field for modifying the name of the collection, and a checkbox labeled Global collection. If the Global collection checkbox is checked, the collection can be added to other models by using the Add rule collection button in the Edit rules tab. The checkbox is unchecked by default for newly created models, to avoid cluttering the list of global collections.
After you have edited the collection by adding, deleting, or modifying rules or by changing the collection name or its global status, you can either save the modifications by clicking the Save button, or reject them by clicking the Cancel button.
3. Post-edit rules
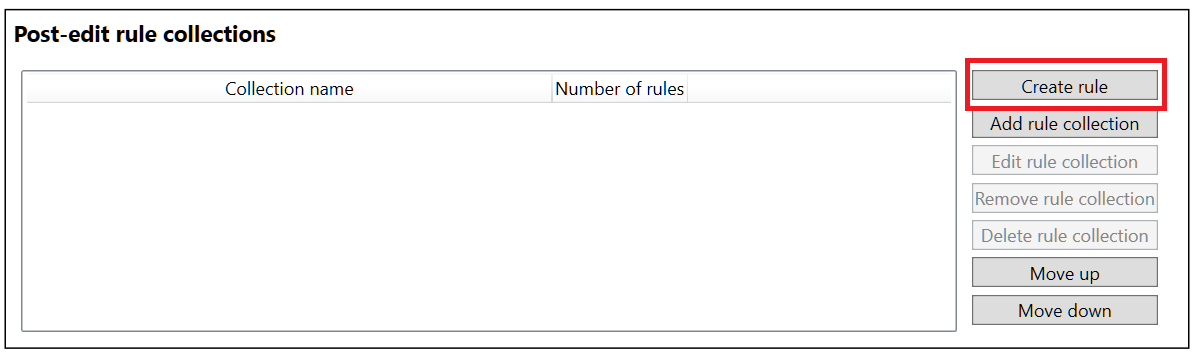
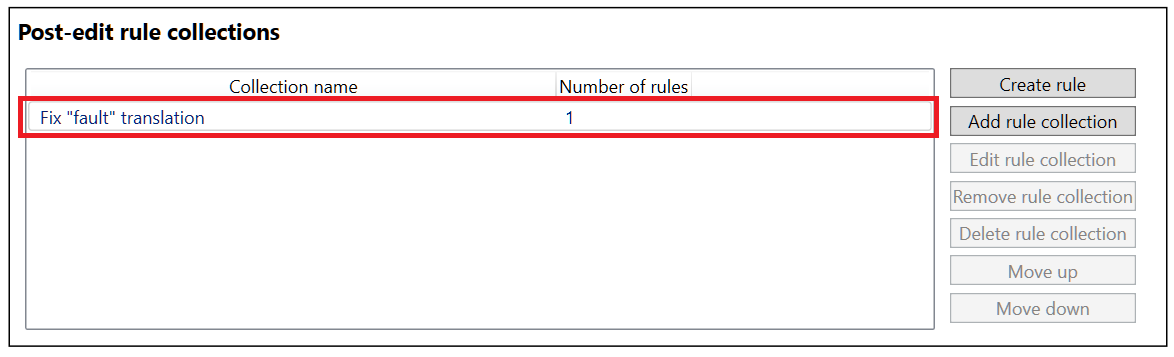
Post-edit rules are used to edit the output of the machine translation produced by the model. You can create a post-edit rule by clicking on the Create rule button in the Post-edit rule collections section of the Edit rules tab:
When you click on the button, the Create post-edit rule window opens:
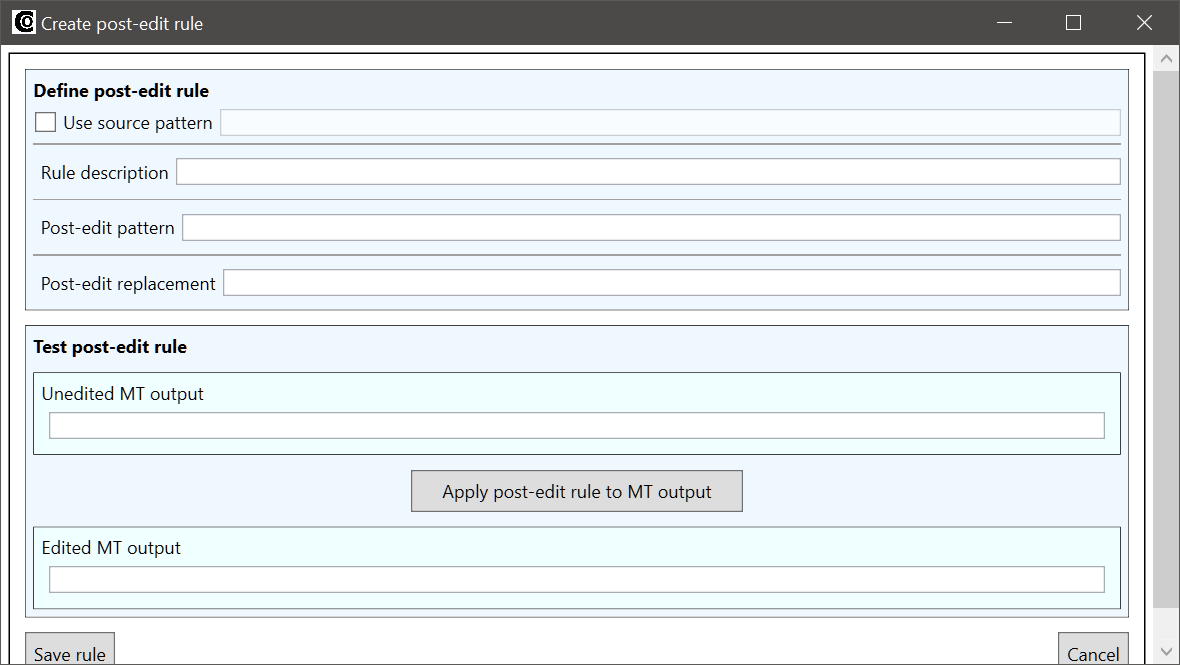
As you can see from the image above, the Create post-edit rule window is also divided into two sections, the upper Define post-edit rule section and the lower tester section. Post-edit rules are very similar to the pre-edit rules described in the Quickstart section, the only difference is that a post-edit rule contains four fields instead of the three for the pre-edit rule:
- Use source pattern: This is a pattern that is searched for in the original source text of the machine translation (i.e. the source text as it is before the application of pre-edit rules, if any). This field is optional, and it has two use cases:
- The source pattern acts a trigger for the application of the rule (the rule is applied only if the pattern is found in the original source text).
- The source pattern is used to copy text from the original source text directly into the MT output.
- Rule description: Freeform description of the rule, preferably as informative as possible.
- Post-edit pattern: This is the pattern that the rule will search for in the source text.
- Post-edit replacement: This is the text that will replace the part of the MT output that has been matched by the Post-edit pattern.
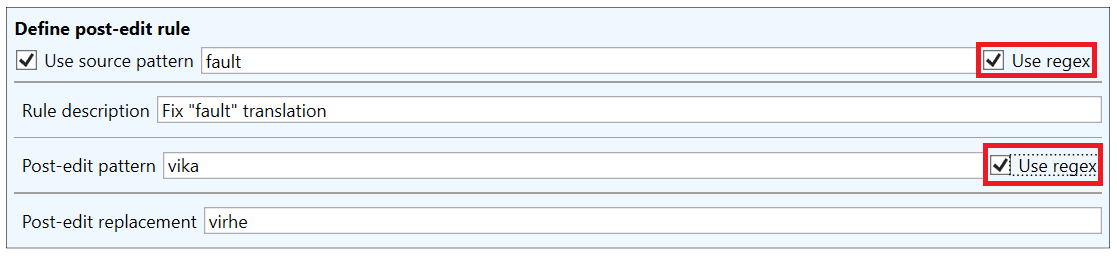
Here’s a simple example rule, where all four fields are used:
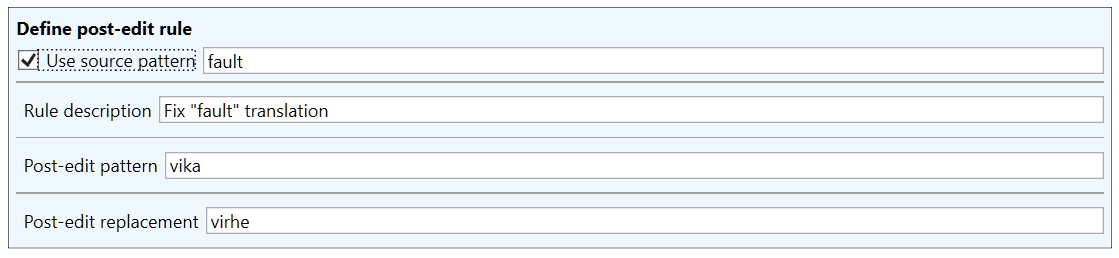
This rule replaces the word vika in the MT output with the word virhe, but only if the original source text contained the word fault. So in this rule, the source pattern is used as a condition for the replacement.
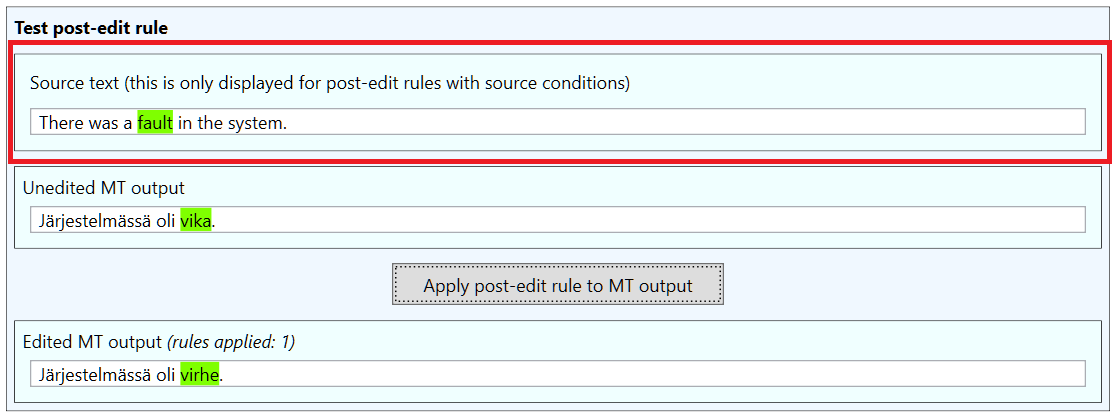
As in the Create pre-edit rule window, the lower section contains a tester, which can be used to verify that the rule works as intended. If a source pattern has been defined, the tester will contain an additional field for entering the test source text, against which the source pattern will be matched:
Once the post-edit rule has been defined, it can be saved by clicking the Save button in the lower left corner. The rule will appear in a new rule collection in the Post-edit rule collections section of the Edit rules tab:
4. Rule testers
Rule testers can be used to verify that the edit rules work correctly both individually and in combination with other rules. Testers are available in the following contexts:
- Create pre-edit rule and Create post-edit rule windows
- Edit rules in collection window
- Edit rules tab
Each rule tester is similar, but there are some differences. The testers in the Create pre-edit rule and Create post-edit rule windows are always visible, and they are always used to test a single rule at a time. See Pre-edit rule tester and Post-edit rule tester for more information on these testers.
The tester in the Edit rules in collection window is hidden by default, and it is used to test all the rules in a collection simultaneously. In this example the pre-edit rule collection from the quickstart with just a single rule has been expanded to handle other common misspellings. The tester can be opened by clicking the expander button under the rule list:
When you click the button, the tester expands. The following screenshot shows the results of testing the rules against a source sentence containing all of the misspellings:
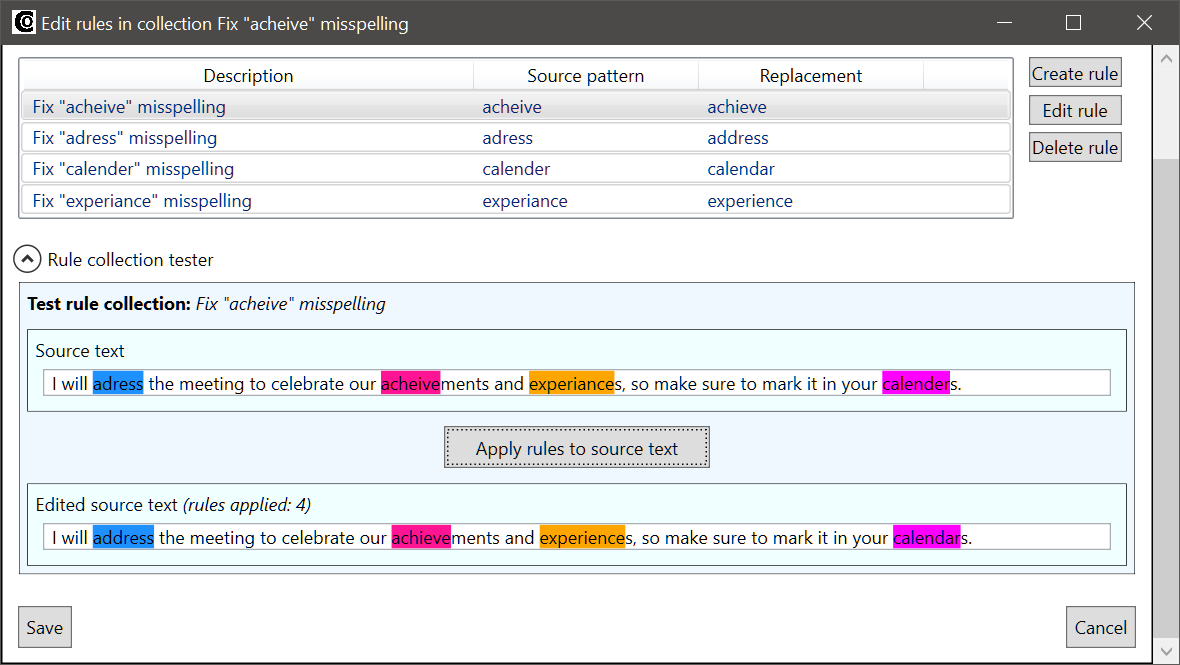
As you can see from the image above, matches for all of the listed rules are highlighted in the tester.
4.1 Testing the entire translation pipeline in the Edit rules tab
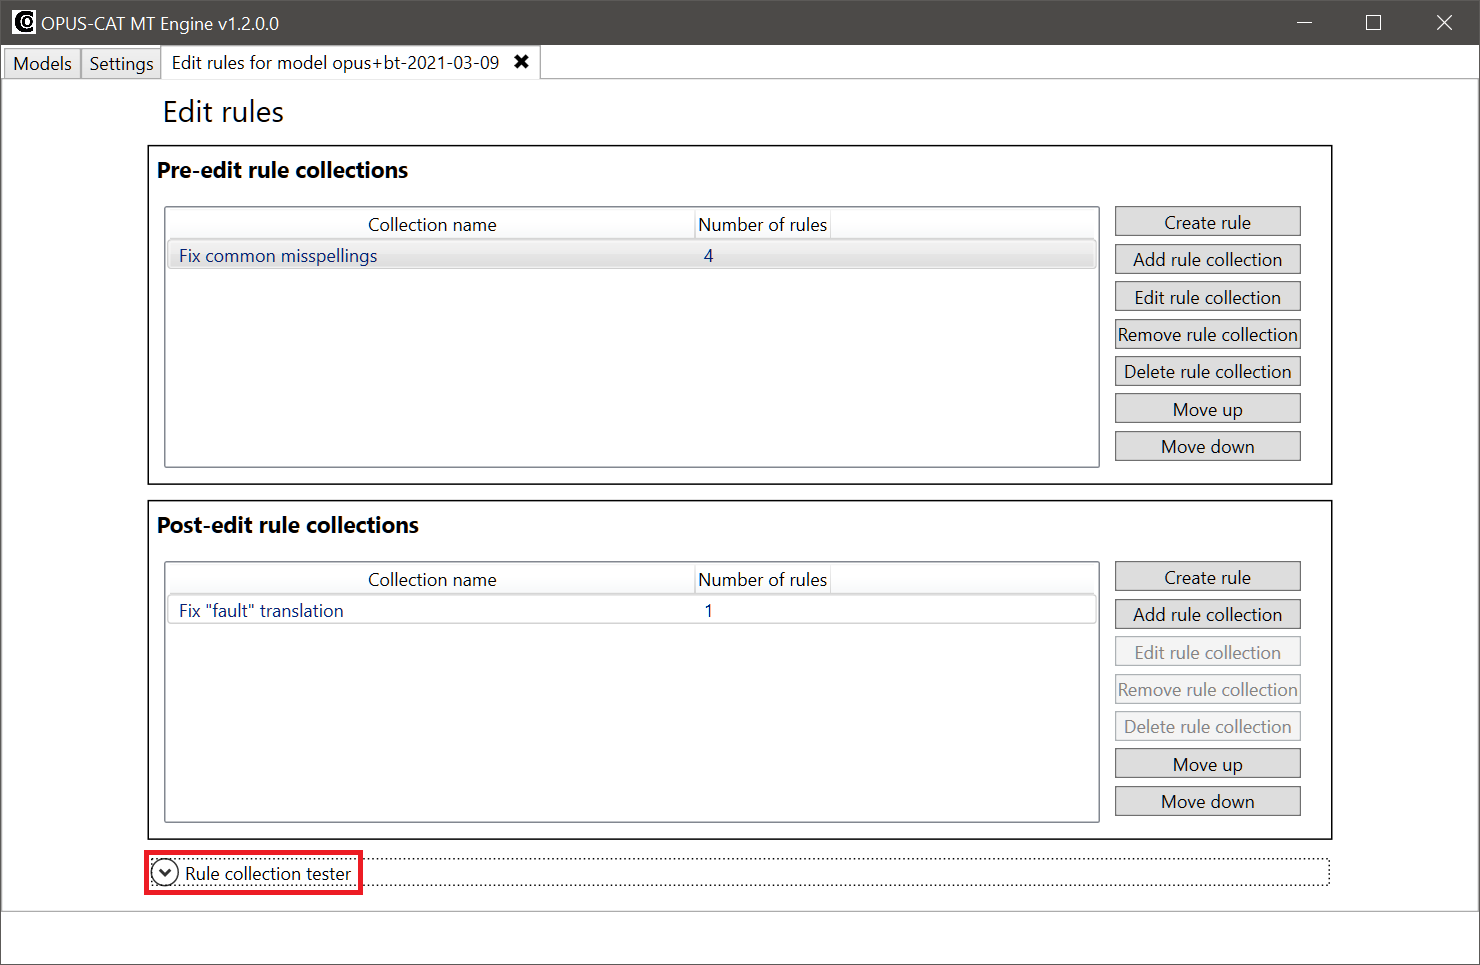
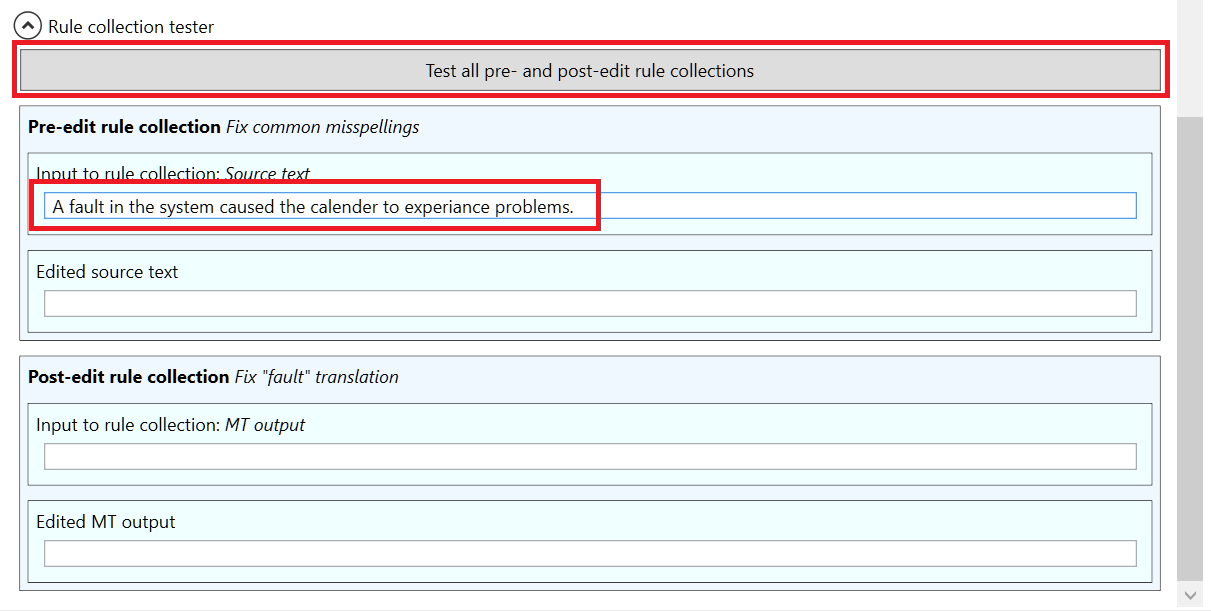
The tester in the Edit rules in collection window is the most comprehensive tester, since it tests both the pre-edit and post-edit rule collections: the tester edits the source text with each of the pre-edit rule collections, then produces a machine translation from the edited source text, and finally edits the MT output with all the post-edit rule collections. This tester is also hidden by default, and it can be opened by clicking the expander button at the bottom of the tab:
In the Edit rules tab tester, only the topmost field, containing the original source sentence needs to be filled. In the following screenshot, a test sentence containing a match for both pre-edit and post-edit rule collections has been entered into the topmost field. All the rules can be applied to the test sentence by clicking the Test all pre- and post-edit rule collections button:
If the Edit rules tab tester is being used for the first time, there will be a slight delay before the results are displayed, since the machine translation model needs to be initialized. The results will appear as follows:
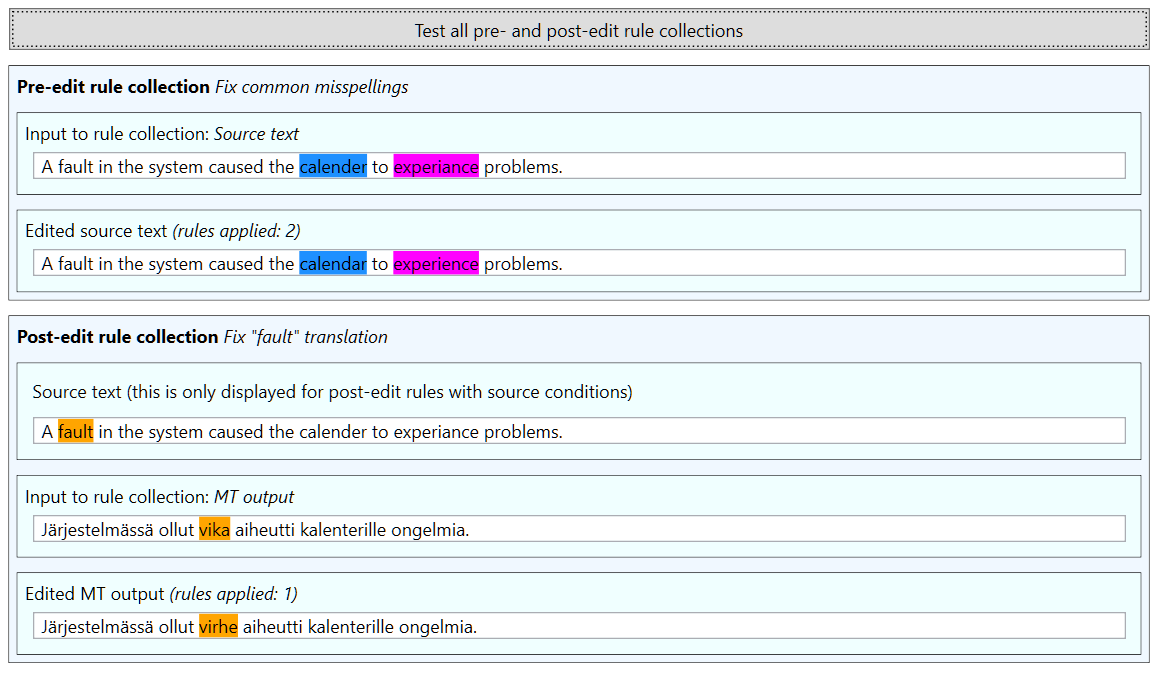
The parts of the text, which match some rule, are highlighted. The image above shows that the original source text is first edited to correct two misspellings (calender and experiance), the edited source text is then used as MT input, and the MT output is then edited to replace vika with virhe (as the source text fulfills the condition of having the word fault in it).
5. Adding, removing, and deleting rule collections
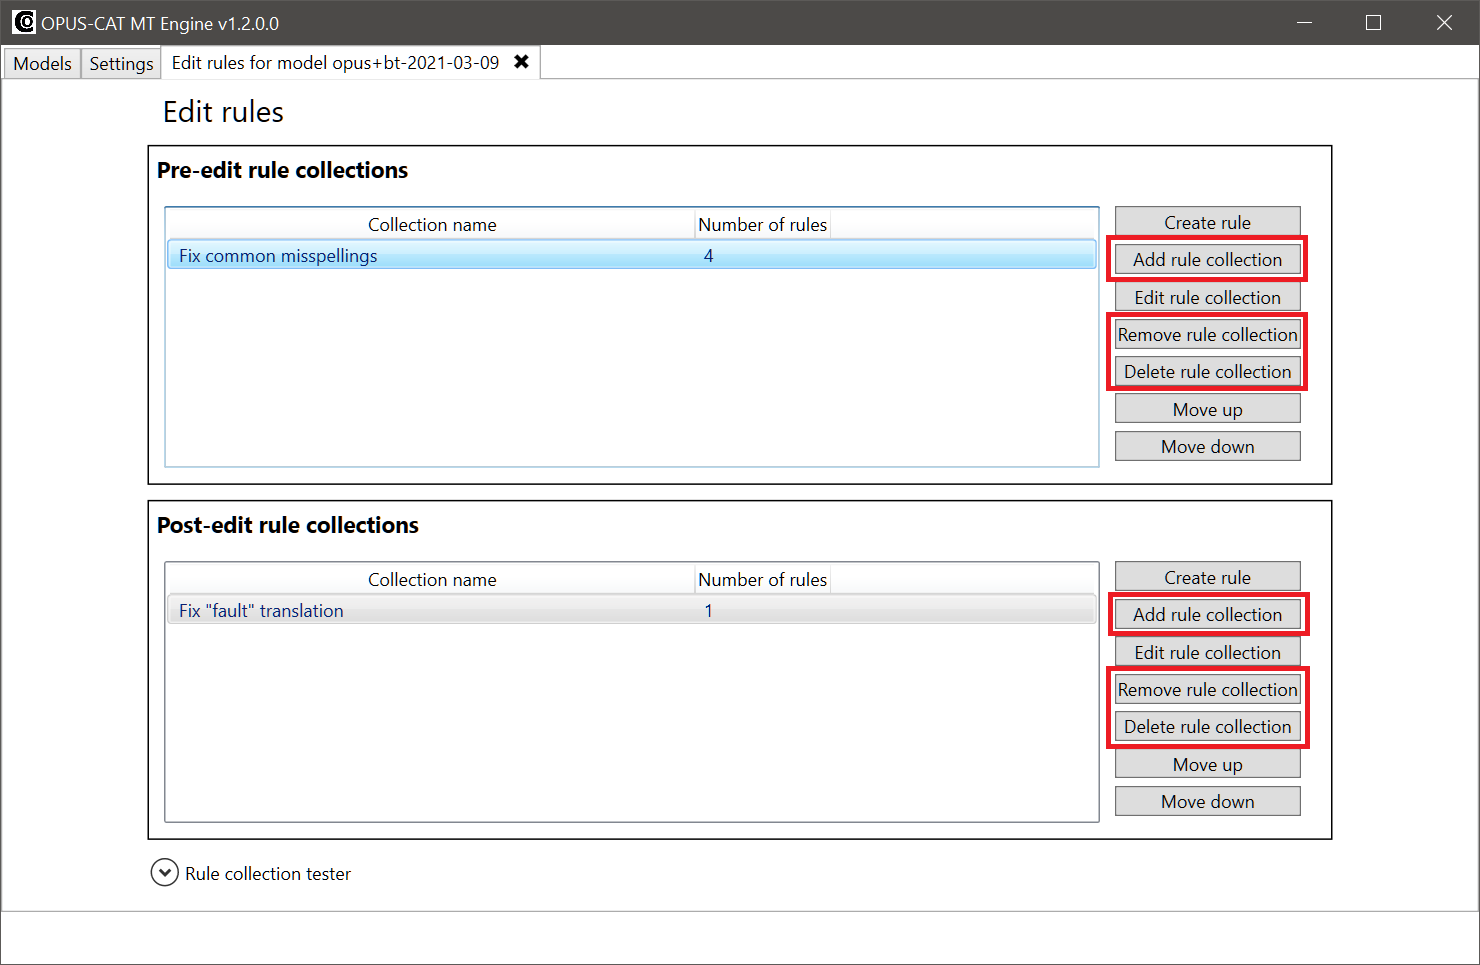
Rule collections can be added, removed or deleted in the Edit rules tab. Rule collections that have been defined as global, can be used in multiple MT models, and they can be removed and added by using the Add rule collection and Remove rule collection buttons. Local and global rule collections can be permanently deleted by clicking the Delete rule collection button (deletion needs to be confirmed, as the same rule collection may be in use in other MT models):
When you click the Add rule collection button, the Add edit rule collection window opens. The window contains a list of all global rule collections. Checkboxes next to the rule collection names indicate, whether a collection has already been included in the model, and you can add or remove collections by checking and unchecking the checkboxes:
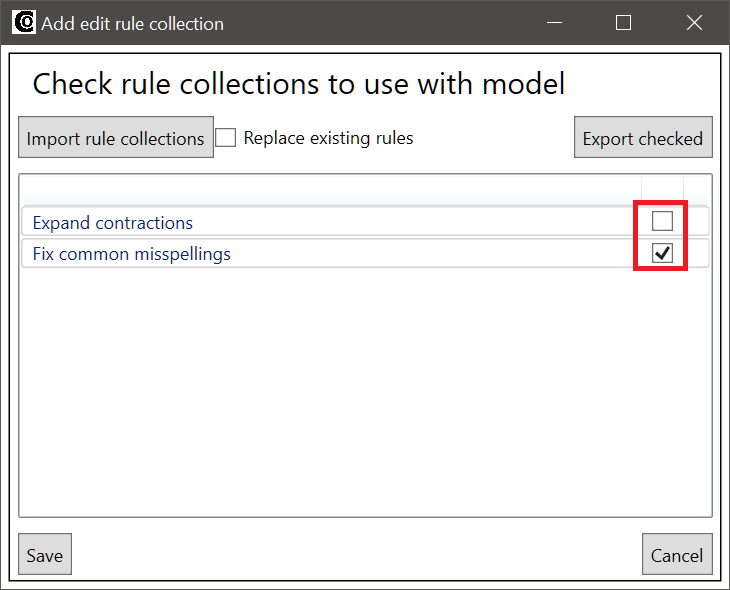
If we check the checkbox for the Expand contractions rule collection and click the Save button, the Expand contractions collection will be added to the rule collection list on the Edit rules tab:

The addition of the collection is also reflected in the tester of the Edit rules tab. Two pre-edit rule collections are now displayed in the tester, and the rules of both collections are applied to the source sentence before it is machine translated:

5.1 Importing and exporting rule collections
The Add edit rule collection window can also be used to import and export rule collections. There are two buttons in the top section of the window:
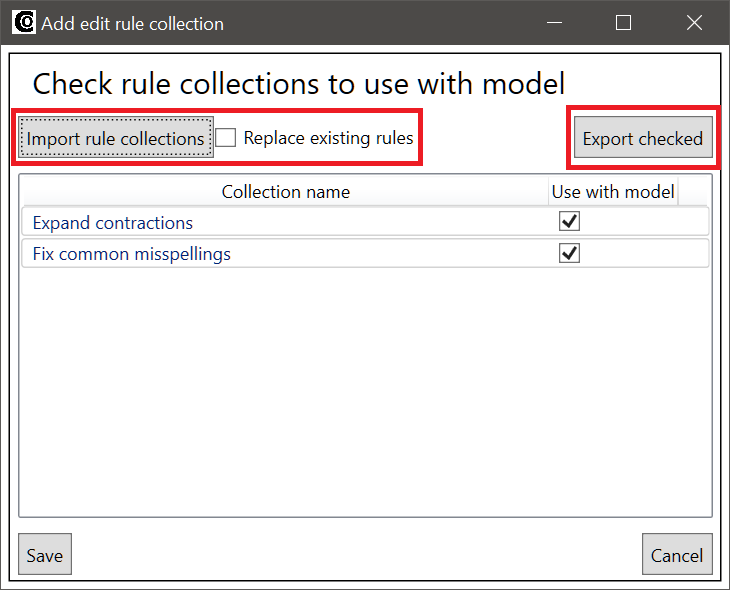
- Export checked: With this button you can export the rule collections, which have a checked checkbox next to them in the list. When you click the button, a folder selection dialog opens, and you can browse to the folder to which you want to export the rule collections.
- Import rule collections: With this button you can import rule collections and add them to the model. Imported rule collections become global, so they can also be used with other models after importing them. Next to this button is the Replace existing rules checkbox. If this checkbox is checked, the rule collections will overwrite existing rule collections that have same ID number. If the checkbox is not checked, the imported rule collection will receive a new ID number, and the old collection will not be overwritten.
6. Using regular expressions in rules
Both pre-edit and post-edit rules can contain regular expressions (.NET regex flavor). Regular expressions enhance the capability of the rules significantly. Providing a comprehensive tutorial on regular expression usage is beyond the scope of this documentation, so this section will only cover the usage of regular expressions in the OPUS-CAT MT Engine. However, there are many introductory articles aimed at translators available, e.g. this article by Riccardo Schiaffino from the ATA Chronicle.
Regular expressions can be used in pre- and post-edit rules by checking the Use regex checkbox when creating or editing the rule:

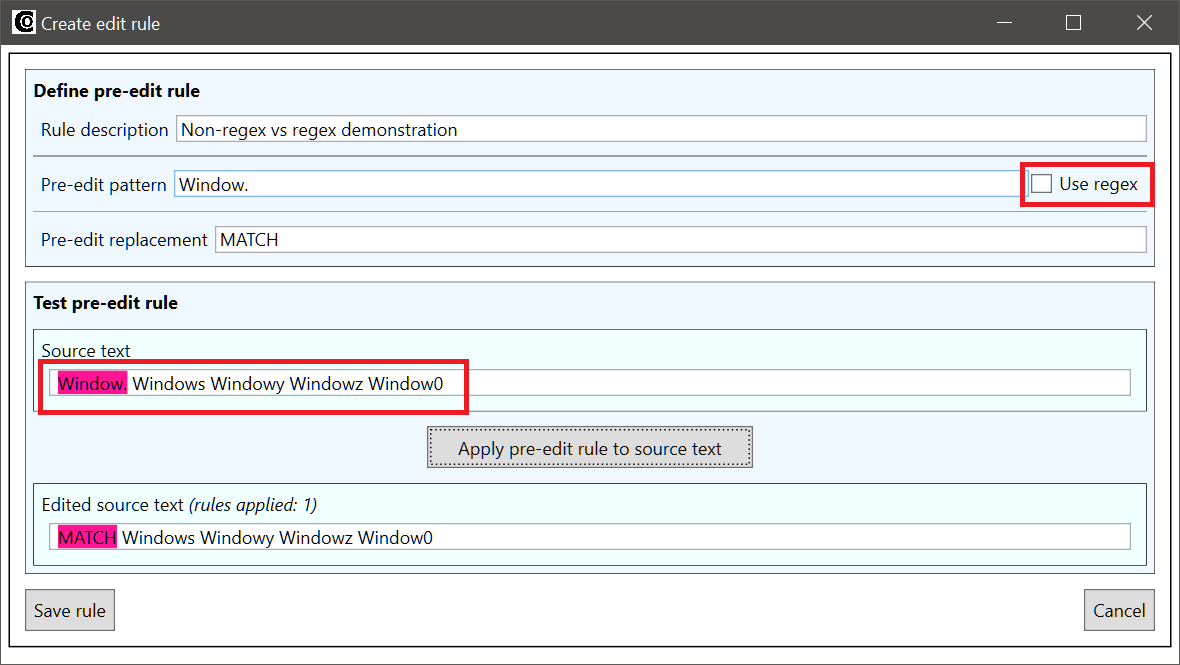
When the Use regex checkbox next to a rule pattern field has been checked, the pattern is interpreted as a regular expression. If the checkbox is not checked, regular expressions special characters in the pattern will be interpreted as normal text. Let’s take for instance the special character . (period), which stands for any character in regular expressions. Let’s say we have the pattern Window.. If the Use regex checkbox has not been checked, the pattern will only match Window.:
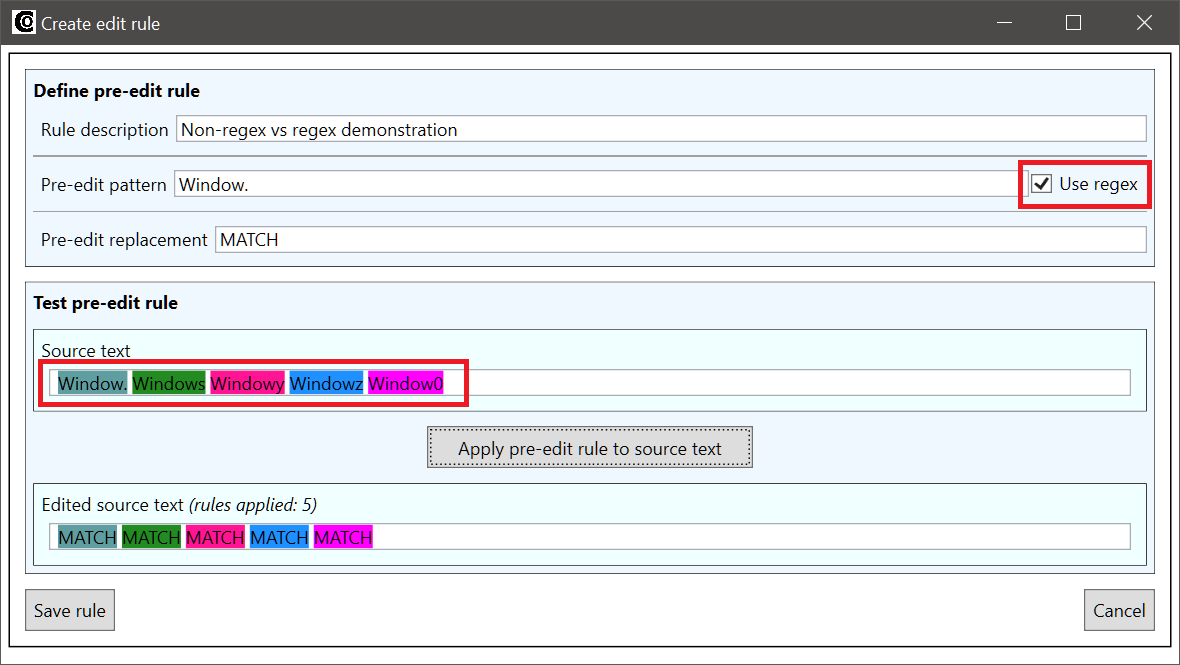
If Use regex is checked, the pattern will match window., windows, window? etc.:
6.1 Capturing groups
If Use regex checkbox has been checked, it’s also possible to use regular expression capturing groups in the replacement fields of the rule. Capturing groups make it possible to copy text from the match to the replacement string. Here’s an example of how capturing groups can be used:
Let’s assume that the source text contains unnecessary hyphens in places where words have been split to separate lines (a common text processing error). An example sentence could for instance be The device may mal-function if not maintained pro-perly. Having these extra hyphens in the source text degrades the quality of the machine translation, so it makes sense to remove them by using a pre-edit rule. Since hyphens are very commonly used in legitimate ways in sentences, the rule to correct this problem needs to be as specific as possible. Instead of just deleting all occurrences of a hyphen, we need carefully define the context in which the hyphen can be deleted. The relevant context here is that the hyphen is between two letter sequences, which we can match with the following regular expression pattern:

The regular expression special character \w matches any letter character, and the quantifier + indicates that there needs to be at least one character before and after the hyphen for the pattern to match. We can verify with the tester that this pattern matches the example sentence:
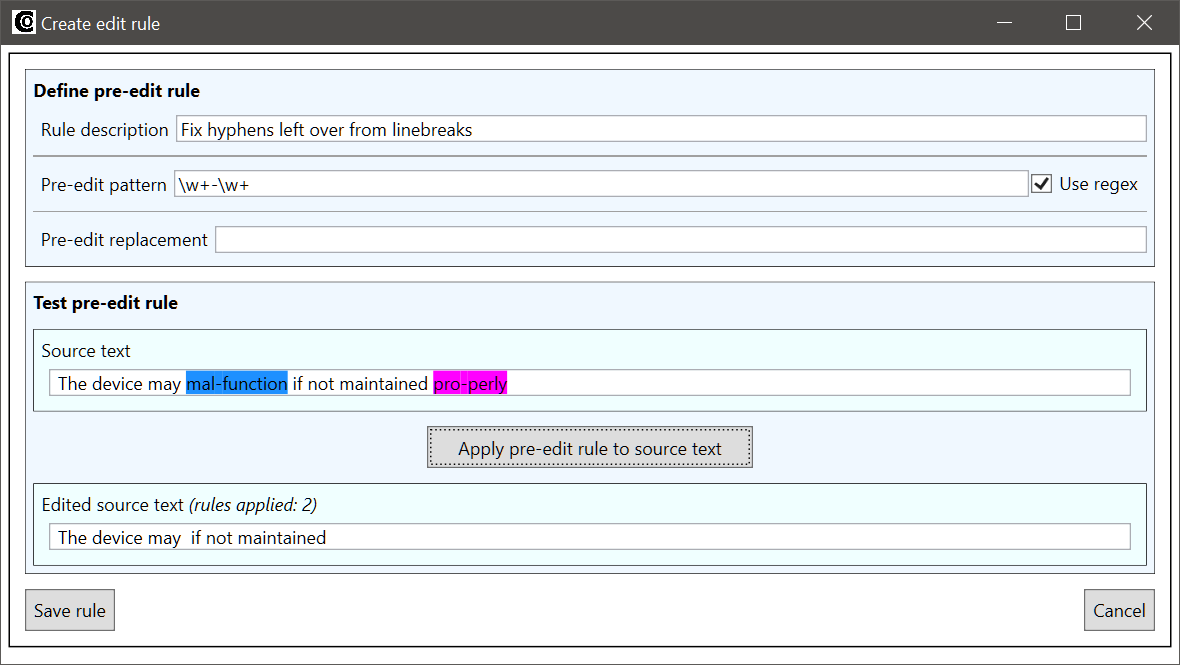
The rule above has an empty replacement field, so it will simply remove the matched words from the output. To remove just the hyphen, we need to use capturing groups in the pattern field of the rule. The simplest way to define a capturing group is to use parenthesis. Each subpart of the regular expression that is placed inside parentheses, is considered a capturing group. In our example, we can define the letter sequences adjacent to the hyphen as capturing groups by placing them inside parentheses:

Capturing groups capture the part of the source text that they match. For instance, since the first capturing group matches the letter sequence mal in the test sentence above, the capturing group will capture mal. The captured text can be accessed during the replacement phase by using a capturing group reference in the replacement field. Capturing groups can always be referred to by their index: the text captured by the first capturing group can be accessed by adding $1 in the replacement field, and the text captured by the second capturing group by adding $2. Here’s how we can use these capturing group references in the hyphen removal rule:
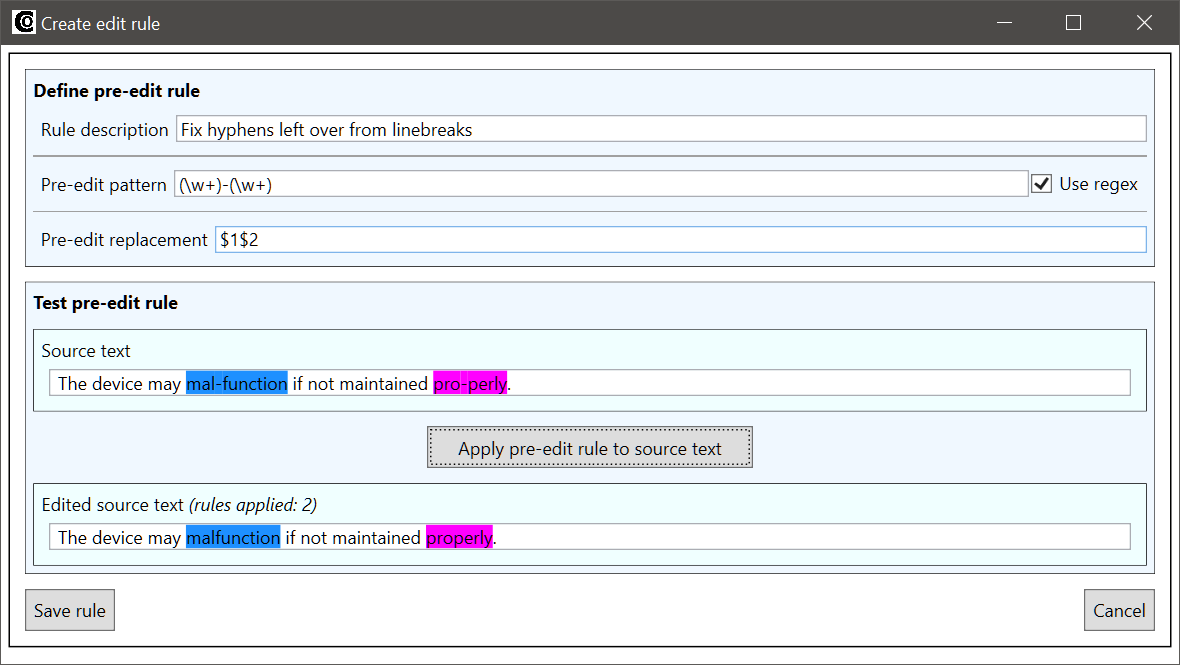
The capturing groups of the rule pattern capture the letter sequences in the incorrectly hyphenated word, and the replacement $1$2 reconstructs the word without the hyphen.
6.2 Changing the character case of text matched by capturing groups
The regular expressions in the OPUS-MT Engine contain some extensions to the .NET regular expression language. One of these is the possibility to convert the text matched by capturing group into lower or upper case. The case of the letters in a capturing group can be converted by adding L (for lower case), U (for upper case), or C (for upper-case first letter) after the dollar sign but before the index. Let’s say for instance that the source text contains sentences that are written in ALL CAPS, i.e. just using upper case letters. This may degrade the quality of the machine translation, so it makes sense to convert the source sentence to lower case before machine translating it. This can be done with the following rule:

In this rule, the source pattern contains two capturing groups, one for the initial character in the sentence, and the second for matching the rest of the sentence. The pattern only matches whole sentences where all letter characters are upper case ([^\p{Ll}] matches everything except lower-case characters). In the replacement field, $L2 converts the contents of the second group to lower case. Since the first character in a sentence should be upper case, it is copied from the source without case conversion by just using $1. We can verify that the rule works by using the tester:
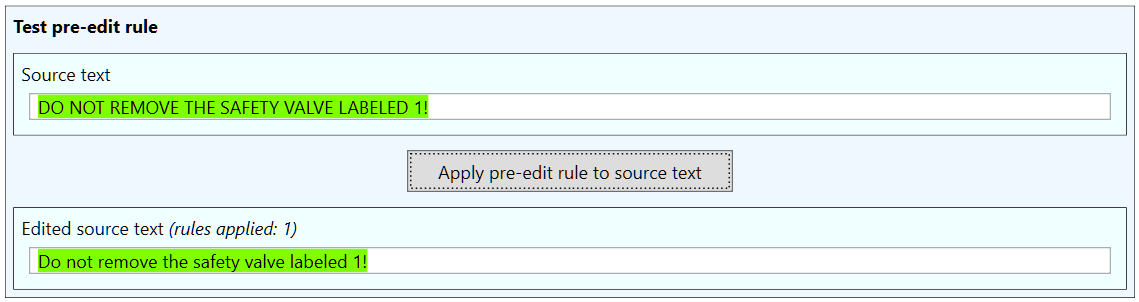
Note that the match covers the whole sentence. This is intended, since the rule should be used only with sentences that contain no lower-case letters.
6.3 Referencing source pattern capturing groups in post-edit rules
As mentioned before, post-edit rules have a source pattern field, which can be used as a condition for rule application: if a source pattern is defined, the source text must match the pattern, otherwise the rule will not be applied. It is also possible to use capturing groups in the source pattern field of post-edit rules. This makes it possible to copy parts of text from the source sentence when applying a post-edit rule. The following example shows one scenario, in which this functionality can be useful:
Let’s imagine we are translating a series of error messages, where most of the source sentences have the following format
ERROR-41443: X caused a failure in Y.
ERROR-12313: Remove Y to reset X.
ERROR-54121: Check that X has been correctly Y'd.
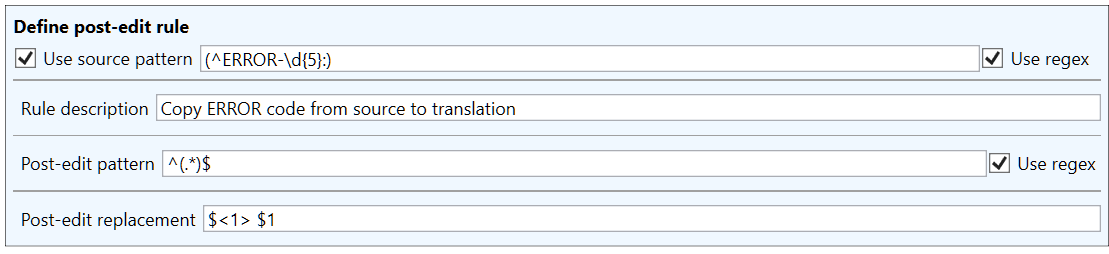
The initial ERROR part of these sentences should not be translated, but the MT models usually do translate it, and it is possible that the machine translation may even change the number part of the error code. With these kinds of sentences with recurring non-translateable sections, edit rules can be used to make sure that the non-translateable section of the sentence is not translated. We can use the following rule to achieve this:
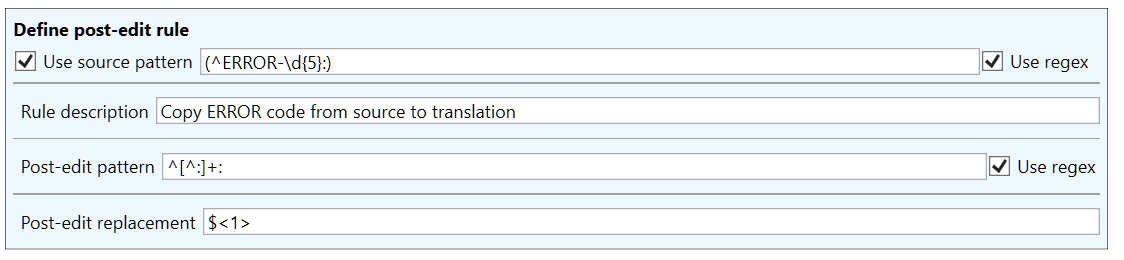
The $<1> in the replacement field is a reference to a capturing group in the source pattern. The capturing group will contain the ERROR-XXXXX part of the source sentence, so it can be used to transfer the text from source to the translation. We can see this rule in action by using the tester:
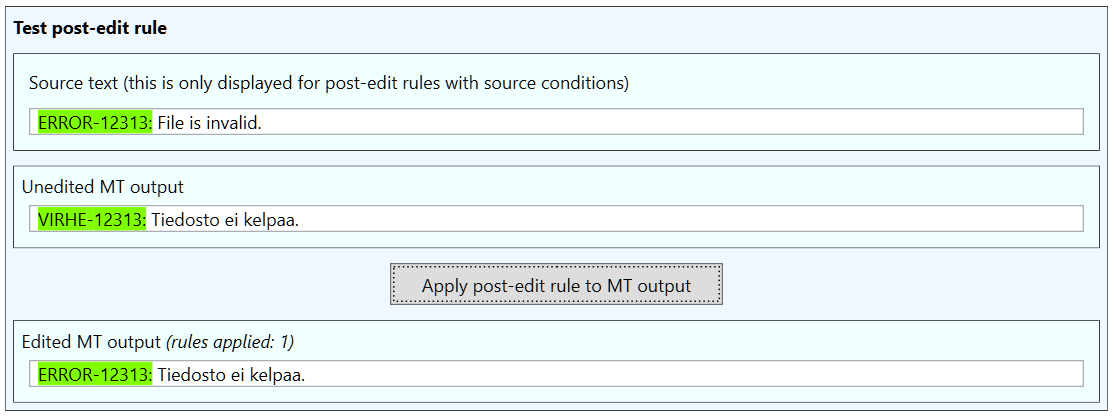
Note that this rule assumes that the translation will preserve the format of the source sentence, i.e. that there will be a colon in the translation to demarcate the point up to which the translation should be replaced with the source text. This might not be the case, since the colon may well be omitted in the machine translation. We can avoid this problem by combining this rule with a pre-edit rule that removes the error code portion of the source text before the source sentence is machine translated:

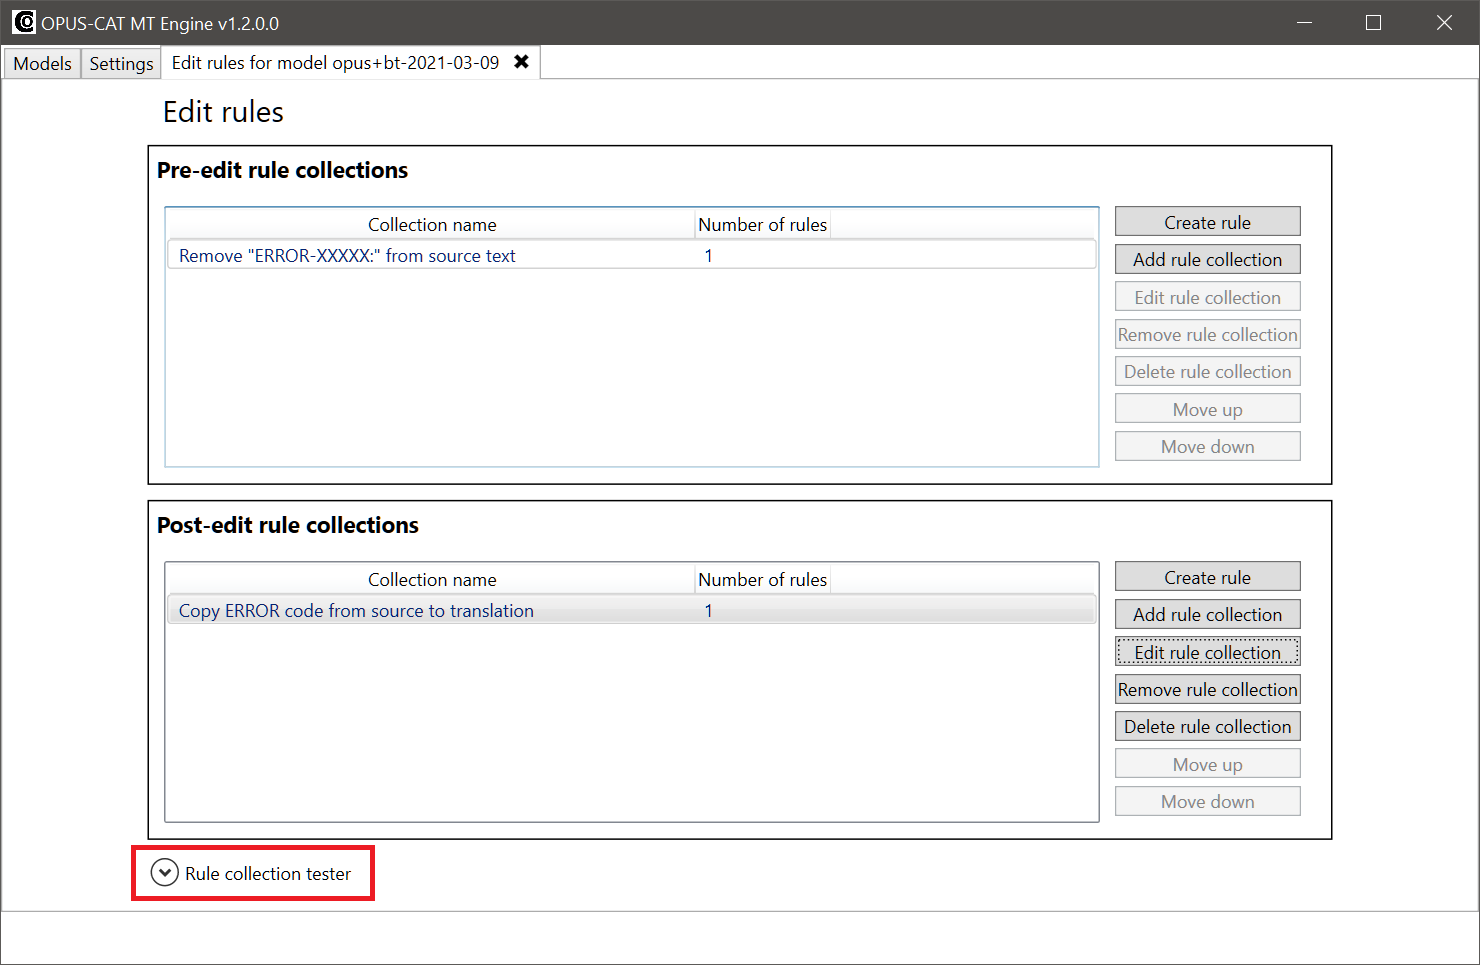
With this rule, the problematic ERROR-XXXXX: part of the sentence is removed before machine translation, so it does not have be replaced by a post-edit rule. Instead, we can use a simpler post-edit rule, which simply adds the ERROR-XXXXX part directly from the original source to the translation, bypassing machine translation entirely:
We can verify that these rules work correctly together by using the tester for the whole translation pipeline in the Edit rules tab:
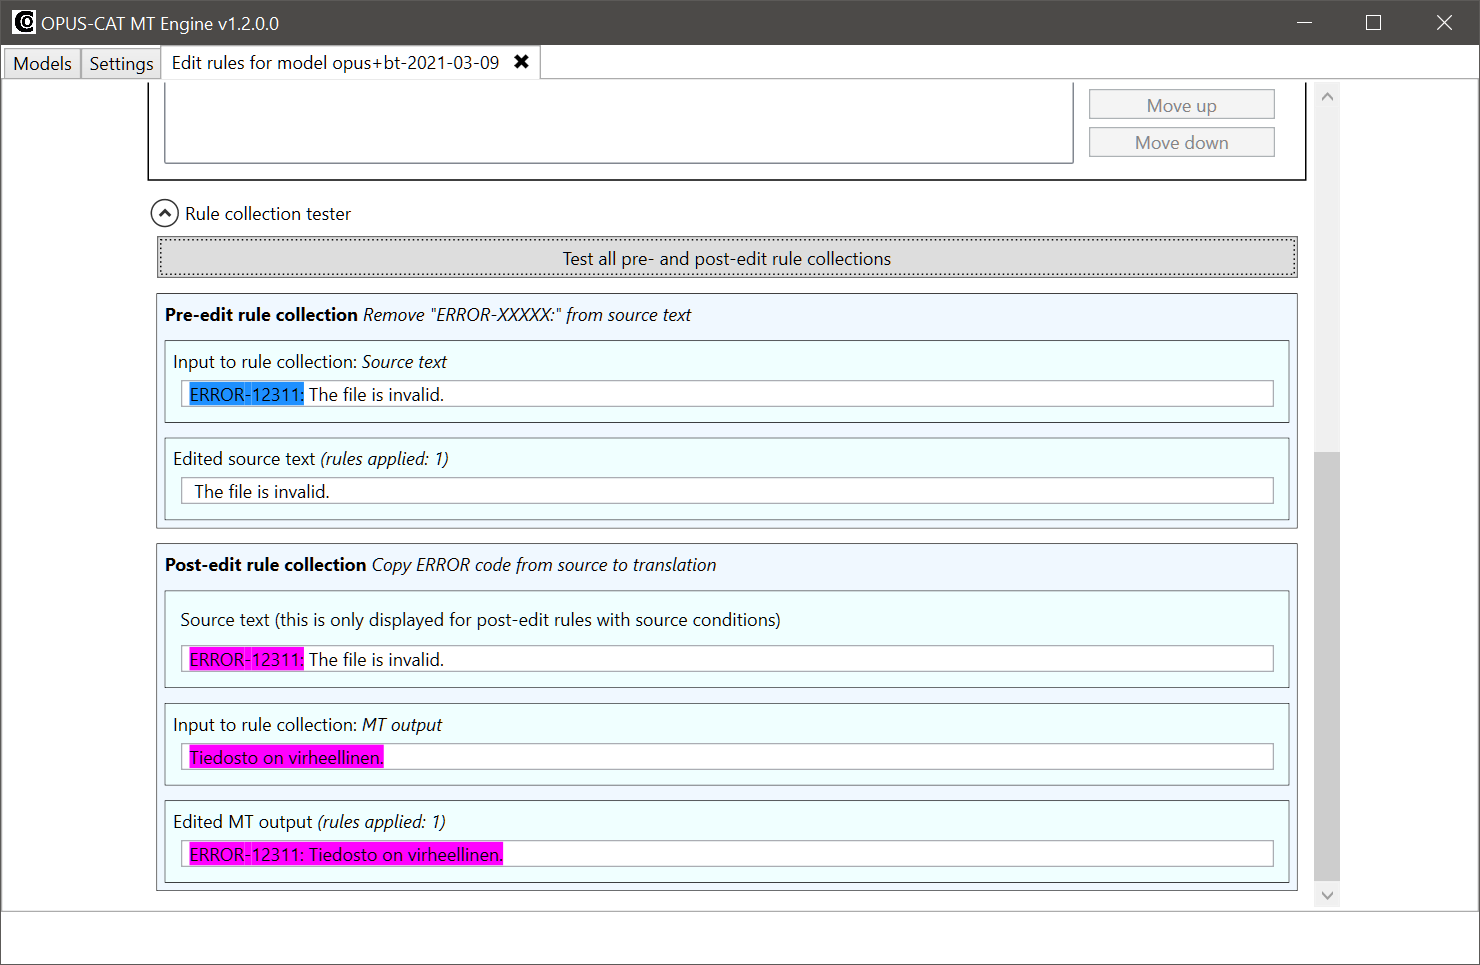
As you can see from the images above, the two rules transfer the text from the original source (top field of the tester) to the final translation (bottom field in the tester), without ever machine translating the problematic part of the source sentence.
7. Using rule collections sequentially
As was demonstrated in the previous section, using rules in combination can be more powerful than just using a single rule. It is also possible to use several pre-edit or post-edit rules together to make more complex replacements than single rules allow for. Each rule collection is processed sequentially, which means that the output of the previous rule collection is used as the input of the next rule collection. To see how rule collections can be combined sequentially to perform complex replacements, let’s return to the case conversion example from the previous section. In the case conversion example we created a rule, which converted ALL CAPS source sentences to lower case (except for the first letter):
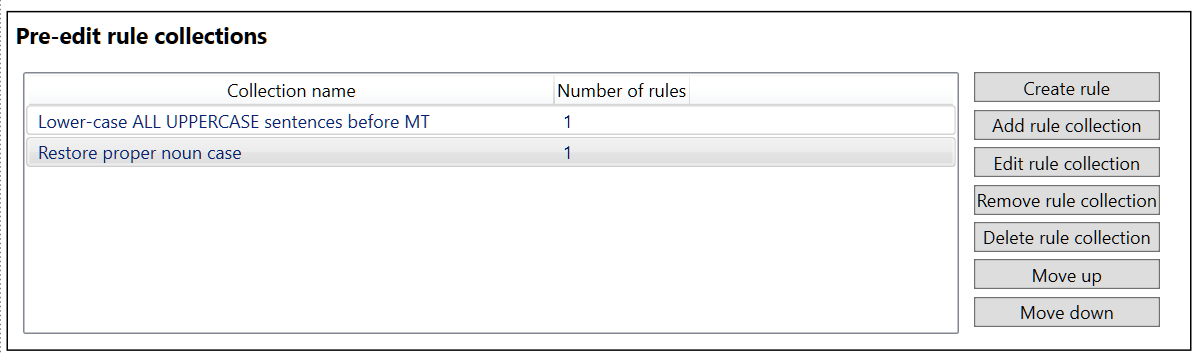
There is a big problem with this rule: it converts all upper-case letters to lower case except for the initial letter, but there may well be other letters in the sentence that should be capitalized (e.g. proper nouns, such as Paris or John) or written in upper case (e.g. many abbreviations, such as EU and UN). These upper case words can be handled by adding another pre-edit rule collection, which takes the case conversion output as its input and restores the proper casing. The rule collection contains two rules, the first of which restores proper nouns:

The capitalization operator $C1 is used in the rule to just upper case the first letter of the capturing group match. The regular expression special characters \b at the start and end of the pattern mean that the pattern will only match complete words (otherwise mary would match with summary etc.) Note that even though the source pattern here contains only four proper nouns, it would be fairly easy to create a regular expression covering a much larger selection of proper nouns by using e.g. a text editor and a list of proper nouns. To verify that the two rule collections work together, we can again use the tester for the whole translation pipeline:
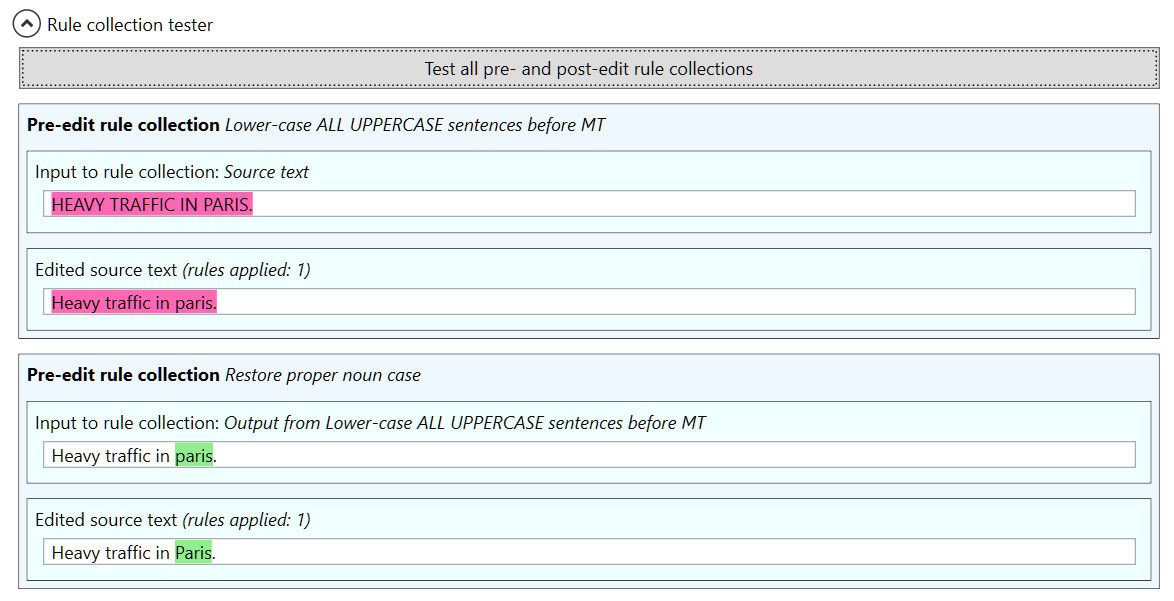
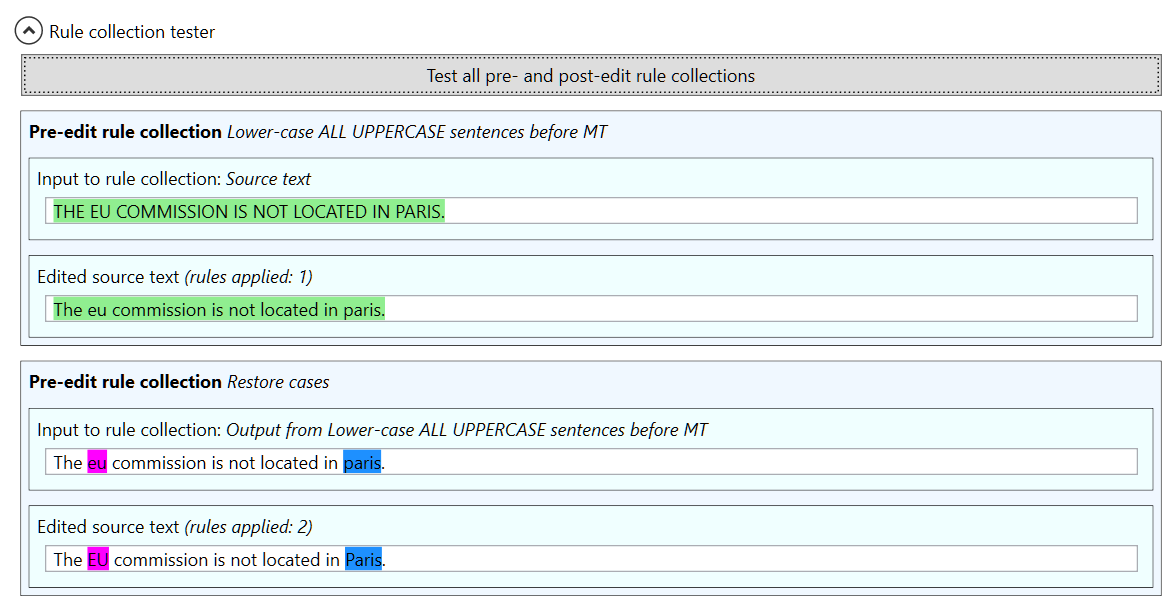
The tester shows that the ALL CAPS sentence is first converted to lower case by the first rule collection, and then the second rule collection restores the correct casing for Paris. If we want to also restore the correct casing for abbreviations, we can add a second rule to the case restoration rule collection:

This time we use the upper casing operator $U1 to upper case the abbreviation. Again, we verify that the rules are working correctly with the complete pipeline tester:
By combining sequential rule collections in this way, very complex replacement operations can be performed.